I cannot stand plugin clutter.
There’s just no need for it. I’ve seen websites with over 60 plugins before and it nearly destroys my soul every single time. I’m in recovery and there’s no better way to recover than by writing an article to help people avoid this pit of despair that can lead to a slow, broken WordPress website.
The reality is that to make a great website you only need a maximum of 10, yes TEN, plugins on your WordPress website. 10 plugins to accomplish everything you want.
So in this article we will review, the top 10 essential plugins that you need for your WordPress website. I will explain, what they are, why you need them, and how to quickly get started with them the easy way.
And stay tuned to the end for a few bonus plugins and themes to really help you build a great site : )
So let’s dive right into it, shall we?
Let’s Explore the Top 10 (and ONLY 10) WordPress Plugins that You Need to Have On Your Website
So first, what exactly is a plugin?
Plugins are tools that you allow you to accomplish your website goals. Whatever custom functionality you think you need for your site, there’s a plugin for it. You need an event calendar on your site? Want you site to load faster? How about adding a Facebook commenting feature? Then there’s a plugin for that.
—Now that that’s settled, let’s move on.
I believe the top plugins should cover everything you need to build a full website from start to finish. What does that mean?
Building a full website means having a few key elements:
- Speed – Caching abilities and fast loading images because loading times matter
- Security – Keep visitor information and data safe from hackers while protecting yourself at the same time
- Efficiency – Tools to build a complete website in the quickest way. We want a great builder and the best WordPress setup
All the plugins we discuss below will cover these key elements and then some. I’ve been using these for a long time and I find they are critical in the building process. Even better, using only a few plugins minimizes your risk of conflict and maximizes your ability to rely on your site to work the right way.
We aren’t just getting a few great plugins to add on to your site, we’re going to review the ONLY ones you’ll ever need on your site! Get these free plugins and you’ll have all the tools you need to create a great, lead-generating website!
1. Google Analytics Dashboard Plugin for WordPress by MonsterInsights

What It Is
Google Analytics Dashboard Plugin for WordPress by MonsterInsights is a traffic analytics plugin integrates with Google Analytics to help you monitor website traffic, goals, conversion rates, bounce rates and more. It takes the complexity of the actual Google Analytics dashboard and shows you just what you need within the WordPress Dashboard.
I’d never setup a website without it. For my clients and my own business, it’s so important to see who is coming to the site and can we service them any better to get them to become a customer. This plugin helps me and my team to come up with those answers.
Why You Need It
Why is it #1 on the list?
Because website traffic and goals are the most important part of every website. Without this information how would you ever know who it coming to site? How would you know how well your website is performing? You wouldn’t! And that would defeat the purpose. I can’t recommend enough, getting Google Analytics setup for your website. It’s the next important step for website optimization.
How To Set It Up Quickly
Here’s how you do the basic setup but please see my full guide to get into more detail here.
- Create your Google Analytics account at analytics.google.com
- Select Admin in the bottom of the left sidemenu
- Click “+Create Account”
- Fill in your business info
- Now with the GADP by MonsterInsights, you can continue through the setup to connect and choose the account you just setup
- Then that’s it! You’ll have you Analytics data showing up on your dashboard. If you don’t see it on your WordPress Dashboard. Simple scroll down the widget and click to drag it up to the top.
2. Yoast SEO

What It Is
Yoast is an SEO plugin used to customize and optimize your content. It is the top SEO plugin next to All-in-One SEO and offers many great tools to optimize your website for search.
With Yoast SEO, you can do 5 important things:
- Customize your search appearance by editing the meta data for posts and pages
- Optimize readability of your posts and pages with simple tips and advice to follow to help you along
- Set your focus keyword to make sure you blog post contains the right content and amount of keywords
- Easily setup the basics that Google and social media platforms, need to understand what your website is about
- And a lot more with the Pro Version. Though I find the free version is all the average website needs
I use it to manage my search appearance and make sure my posts and pages are optimized for readability and keywords.
Why You Need It
SEO traffic is the best traffic. It’s free, it’s effective, it’s POWERFUL. Getting your SEO together should be a priority from the get-go. I can’t recommend enough, taking the time to sit down and build a list of keywords you feel people would use to find your business and content. After that’s done, come up with some potential blog post ideas that you can write about related to your service or product.
I could go on and on and on because there is so much you can do in this arena to grow your audience, but I need to keep it simple….
SEO traffic can make your business and bring you a lot of traffic. There is a lot that be done to optimize your website for better rankings in the search engines. Yoast SEO simply makes this easier to do.
How To Set It Up Quickly and Work With It
- Yoast makes it pretty simple with a full Setup Wizard to get the basics together
- As you work with your posts and pages be sure to always scroll to the bottom and setup the Search Appearance, which means customizing your meta title and meta description and set your focus keyword to get relevant feedback on optimizing your post/page
That’s it!
3. Elementor

What It Is
Elementor is a WordPress page builder. It’s my favorite page builder as a matter of fact! I tried Divi, SiteOrigin, Visual Composer, and theme builders. None truly compare to Elementor in my experience (especially with the PRO version).
Elementor let’s you build your WordPress site visually. Literal drag-and-drop. You your page to be laid out a certain way? You can build it exactly how you want with Elementor. It comes with so many great elements in just the free version and I’ve found that it can do just about everything I want as someone that designs from scratch. It gives me the ability to create freely, knowing I can bring that visual to life.
Why You Need It
I know the number one issue for individuals when creating their business website it the look of it. You’ll scroll through theme after theme, trying and testing so many, only to find neither one looks the way really want it too.
And I’m with you.
It’s those kind of limitations, I like to avoid.
You can build what you want. You can make it look the way you want it to and guess what? You don’t need a theme to do that and you don’t need to program to do that. All you need is Elementor and one special theme that I mention at the end of this article.
Trust me on this one ( ;
How To Set It Up Quickly
- Search for Elementor and install and activate it on your site
- As an example, go to your Home Page under Pages and select Edit With Elementor to officially activate Elementor for that page
- You’ll now be in the builder. Here you can literally drag and drop Elements from the left sidebar wherever you need.
- When you’re done, click Update!
- Now click
I’m actually building a course at the moment where I go into much more detail on building your website from scratch using Elementor. In the course I also review design and how to create a good looking website without any design skill. I recommend checking it out and signing up for the early bird pricing. You can do that here.
4. TinyMCE (now Advanced Editor Tools)

What It Is
TinyMCE has been around for a long time and for good reason. It provides options in the toolbar that aren’t there by default in WordPress. This plugin is so simply useful and now that I think about it, I don’t think I’ve ever made a website without it.
It just makes things more efficient.
Underlining items and setting font sizes becomes much simpler tasks.
It’s easiest to show why. Below I took a snapshot of what the text editor is by default before TinyMCE has been activated and setup and then what it looks like after:
Before TinyMCE:

After TinyMCE:

You can see how many more text editing options are added once you get TinyMCE. They are al very helpful and even if you don’t think you need them now, you definitely will at some point when building your WordPress website.
Why You Need It
Efficiency. Plain and simple. You won’t need to edit code to do a strike-through or underline (see that? took me 2 seconds!). You won’t need to figure out pt vs px when sizing fonts or struggle wondering if you can highlight text. TinyMCE has everything you need. You’ll save time and that’s a huge win.
How To Set It Up Quickly
- Install and active TinyMCE. It’s always easy to find as it’s one of the top WordPress plugins
- Under Settings, you’ll find TinyMCE. This is where you can configure it.
- Select the Classic Editor tab
- Drag elements to the toolbar that you’ll use. I recommend adding Strikethrough, Underline, Background Color, Toolbar Toggle.
- Scroll down a bit and check Font sizes

- Finally, click Save Changes and you’re done!
5. WordFence

What It Is
You don’t want to skip this plugin.
Wordfence keeps your website secure. It includes an endpoint firewall, a malware scanner, with everything built to protect WordPress. But honestly, you don’t need to know what any of that means and there’s no need to go through all the details.
There’s only one thing you need to know.
It adds a serious layer of security to your website. I won’t say it completely keeps you protected because there are so many factors that contribute to keeping a website totally secure but Wordfence is a truly great start.
(I’ll detail another method below).
Why You Need It
It will help you keep your website secure. I’ve seen too many websites get hacked due to poor security ad the website owners always suffer. Wordfence isn’t going to completely secure everything but it would’ve been enough for the cases that I’ve encountered.
To top it all off, Wordfence is a very passive plugin that won’t require much attention from you to keep you website secure. Just make sure you keep it up-to-date and you’re good!
How To Set It Up Quickly
- Install and activate the Wordfence plugin
- Enter your email to receive alerts about your website
- Opt out of upgrading to the Premium version. You can No thanks in the prompt to skip the license.
- Now go to Wordfence in the left sidemenu to edit the plugin settings. Since you just installed it Wordfence will take you through a short tutorial showing you around the place. I recommend going through all the steps to learn more about how to use it correctly
- That’s it!
6. Really Simple SSL

What It Is
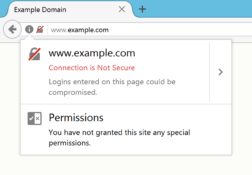
Security has never been more important to consumers. Companies like Firefox and Chrome seem to understand this and take it seriously. You may have noticed the green lock in your website address bar when browsing online. You may have also noticed the warnings that Firefox and Chrome will give you if a site isn’t secure.
What you’re seeing is exactly what Really Simple SSL helps with!
Really Simple SSL is probably the simple and most effective plugin on this list. Once you purchase and install an SSL certificate on your website, it’s important to switch your site over to the secure version.
- Unsecured sites start with http://
- Secure websites will start with https:// (notice the ‘s’)
Installing an SSL certificate on your website doesn’t change the http:// to https:// by default, so you need to Really Simple SSL to handle this for you.
Why You Need It
There are two reasons why you need Really Simple SSL.
First, data is encrypted. When someone submits info on your website you or your website visitors, it will be encrypted which means hackers can’t read it. This is a very good thing : )
Second, a secure website is a ranking factor for Google. This is most likely because people are quick to leave a website that isn’t secure.
Well, you tell me. Do you think people will stay on your site, submit their personal information if they see this….

No sir!
Really Simple SSL will hand the switch from http:// to https:// for you in one click. It is not a SSL certificate but it will switch all your links after you install an SSL certificate.

How To Set It Up Quickly
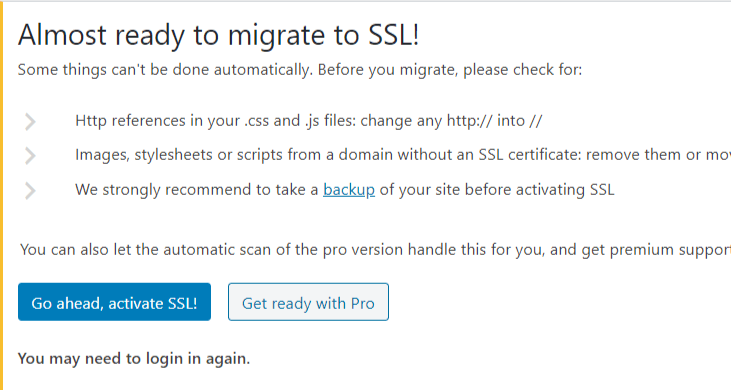
- Install and activate the plugin
- Now click “Go ahead, activate SSL!”
- Then you’re done! Told you it was easy!
8. EWWW Image Optimizer

What It Is
Optimize your images and you speed up your website! Loading speed is one of the top ways to get more people to stay on your website. You’ve probably heard many times that nowadays, a visitor won’t stay on your website if it doesn’t load in less than two seconds. It’s pretty true!
EWWW makes the process easy. You get thousands of free credits when you sign up which will be more than enough for building one website.
You’ll be able to bulk optimize images and reduce their file size dramatically to have them load much faster on your website. All that without losing the quality.
Why You Need It
It’s easy to use and you’ll need an image optimizer. Our photos are such high quality now which means larger file size. To show beautiful imagery on your website, you’ll need those images to be smaller in size. This will ensure your site loads quickly and website speed is everything!
How To Set It Up Quickly and Use It
- Install and activate
- You’ll find the plugin settings under Settings in the left sidebar but you won’t need to edit these with the free version
- To optimize the images, select Bulk Optimize under Media to optimize all images
 Pro Tip: To optimize only select images go to Media > Library then click the list view (see screenshot).
- Now you’ll be able to optimize specific images or even restore some back to the original.
- That’s it!
8. W3 Total Cache

What It Is
Utilize a cache and speed up your website!
W3 Total Cache utilizes this and much more to improve the speed of your website and I highly recommend it or another cache tool. It enables website optimizing tools and effects and that you definitely wouldn’t want to do yourself all at the click of a button!
Here’s a great article on the top 8 wordpress caching plugins.
Why You Need It
SEO couldn’t be mentioned more in this blog post. It is just that important. It can account for so much of your sales and business and can ultimately help you get exactly what you want from your website. Whether that be money, sales, exposure, a bigger audience, to reach more people, it can help you get there.
How does this play in?
W3 Total Cache speeds up your website. Speed is a huge ranking factor because Google is in the people business. Ranking is not about tricks and sneaky methods, it’s about people. If people don’t stay on your site to read your content, then you will not be shown. Make your website fast and secure, and you’re on your way to a website that can help you accomplish your goals.
Sounds good, huh?
How To Set It Up Quickly
- Install and active W3 Total Cache
- You’ll find the settings for it under Performance in the left sidebar
- Select General Settings
- Enable Page Cache then Save All Settings
- Then you’re done!
9. Classic Editor

What It Is
Classic Editor was the default text editor used for posts and pages before Gutenburg which came with WordPress 5.0 on November 27, 2018. Let’s just say me and many many other WordPress users didn’t take too kindly to Gutenburg. Classic Editor quickly became the top WordPress plugin with millions of installs showing how useful it still is to WordPress users.
Without blocks and other clunky elements, it makes creating posts and page content a much quicker process and you know what that means? Efficiency!
Why You Need It
Okay, okay, okay. I’ll set aside my bias for a second here. You don’t NEED this plugin. You can live with Gutenburg, just alright, especially if you’re new. It’s just…..it’s just hard for me personally *wipes tears* to use that over the Classic Editor. Objectively though, the Classic Editor is much more efficient than Gutenburg and that’s why I recommend it.
Also note, there are potential SEO benefits to using the Classic Editor because of the lack of blocks. Gutenburg creates more code that could effect speed and how easily Google can read and index your website. So do keep that in mind.
How To Set It Up Quickly
- Install and activate the plugin
- You’re done!
10. Disable Comments

What It Is
Disable Comments let’s you…………..disable comments!
WordPress sites unfortunately, get a lot of spam. A LOT. One way to stop this spam is to disable comments. The plugin allows you to disable comments on the entire site or only on certain types of post types like Media, Pages, or Posts.
Why You Need It
I was asked by a nonprofit recently to help fix up their site, update it, and speed it up. Upon entering their WordPress site, I saw hundreds of thousands of spam posts and comments. I won’t go into the details of how they were hacked and what I did for that right now, but know that once that spam was removed, the website was notably faster. The database would hold all of the nonsense otherwise so let’s nip that issue in the bud right now and disable comments from the start.
If you would really like commenting. There are many other options like Disqus and Facebook that let you add commenting to your site without the spam that typically comes with it.
How To Set It Up Quickly
- Install and activate the plugin
- Under settings, select Disable Comments
- Everywhere will be selected by default so all you need to do is click “Save Changes”
- That’s it!


 Pro Tip: To optimize only select images go to Media > Library then click the list view (see screenshot).